
Embedded graph database using Neo4j Example.
Here we are going to look at creating a simple example of embedded graph database using Neo4j.The Graph data structure contains Nodes Relationship and Properties. We would be looking at simple example of embedded Neo4j Graph Database using spring frameworks.
- Project Dependencies.
- Create Spring Context.
- Create ApplicationConfig Class.
- Create AbstractEntity Class.
- Create Element Class.
- Create ElementDAOImpl Class.
- Create a unit test for ElementDAOImpl Class.
- Run the Junit Tests and Check the data with neoclipse.
- Download The Example.
1.Project Dependencies.
JDK 1.6 or above, Neo4j based spring jar , other Spring dependency jar, logging jars, junit jar, are the ones we would need. The pom file dependencies are listed below.
<properties>
<spring.version>3.2.3.RELEASE</spring.version>
</properties>

<dependencies>
<dependency>
<groupId>org.springframework.data</groupId>
<artifactId>spring-data-neo4j</artifactId>
<version>2.2.0.RELEASE</version>
</dependency>

<dependency>
<groupId>org.springframework</groupId>
<artifactId>spring-aop</artifactId>
<version>${spring.version}</version>
</dependency>

<dependency>
<groupId>org.springframework</groupId>
<artifactId>spring-asm</artifactId>
<version>3.1.4.RELEASE</version>
</dependency>

<dependency>
<groupId>org.springframework.boot</groupId>
<artifactId>spring-boot-starter</artifactId>
<version>1.0.0.RC1</version>
</dependency>

<dependency>
<groupId>javax.validation</groupId>
<artifactId>validation-api</artifactId>
<version>1.0.0.GA</version>
<scope>runtime</scope>
</dependency>

<dependency>
<groupId>cglib</groupId>
<artifactId>cglib</artifactId>
<version>2.2.2</version>
</dependency>

<!-- Logging Dependencies -->

<dependency>
<groupId>org.slf4j</groupId>
<artifactId>jcl-over-slf4j</artifactId>
<version>1.7.0</version>
</dependency>

<dependency>
<groupId>org.slf4j</groupId>
<artifactId>slf4j-api</artifactId>
<version>1.7.0</version>
</dependency>

<dependency>
<groupId>org.slf4j</groupId>
<artifactId>slf4j-log4j12</artifactId>
<version>1.7.0</version>
</dependency>


<!-- junit Dependencies -->

<dependency>
<groupId>junit</groupId>
<artifactId>junit</artifactId>
<version>4.8.1</version>
</dependency>

</dependencies>
Maven Compiler Plugin...
<build>
<finalName>EmbeddedDbNeo4j</finalName>
<plugins>
<plugin>
<artifactId>maven-compiler-plugin</artifactId>
<version>3.1</version>
<configuration>
<source>1.6</source>
<target>1.6</target>
</configuration>
</plugin>
</plugins>
</build>
2.Create Spring Context.
Add spring-data-context.xml in the resources folder. This file provides the required neo4j config for store Directory and graphDatabaseService. More info in this regard, Please refer documentation on Spring Data Neo4j and Neo4j Spring Documentation.
<?xml version="1.0" encoding="UTF-8"?>
<beans xmlns="http://www.springframework.org/schema/beans"
xmlns:xsi="http://www.w3.org/2001/XMLSchema-instance" xmlns:neo4j="http://www.springframework.org/schema/data/neo4j"
xsi:schemaLocation="http://www.springframework.org/schema/beans http://www.springframework.org/schema/beans/spring-beans.xsd
http://www.springframework.org/schema/data/neo4j http://www.springframework.org/schema/data/neo4j/spring-neo4j-2.0.xsd">
<neo4j:config storeDirectory="graph.db" />
<neo4j:config graphDatabaseService="graphDatabaseService" />
</beans>
3.Create ApplicationConfig Class.
Now, we are going to configure the Neo4j context programmatically. This is done by creating ApplicationConfig Class to setup a Spring container,GraphDB and Neo4JTemplate. Two Bean methods are provided in this class.The method graphDatabaseService() provides bean of type GraphDatabaseService. The method template() provides bean of type Neo4jTemplate by referring to graphDatabaseService() method.
@Configuration
@ImportResource("classpath:spring/spring-data-context.xml")
public class ApplicationConfig {

@Bean(destroyMethod = "shutdown")
public GraphDatabaseService graphDatabaseService() {
return new EmbeddedGraphDatabase("graph.db");
}

@Bean
public Neo4jTemplate template() {
return new Neo4jTemplate(graphDatabaseService());
}
}
4.Create AbstractEntity Class.
Now create Abstract class AbstractEntity.This class acts as a template class providing id for the classes extending the abstract class. The id variable is annotated with @GraphId. Also overriding equals method and hasCode can be defined in this class.
public abstract class AbstractEntity {
@GraphId
private Long id;

public Long getId() {
return id;
}

@Override
public boolean equals(Object obj) {
if (this == obj) {
return true;
}
if (id == null || obj == null || !getClass().equals(obj.getClass())) {
return false;
}
return id.equals(((AbstractEntity) obj).id);
}

@Override
public int hashCode() {
return id == null ? 0 : id.hashCode();
}
}
5.Create Element Class.
Now create the class which extends the Abstract Entity class. In our example we are creating a class called Element. This class has subElements of its own type and also has baseElement to represent its parent Element. Its own type is defined by a name, value and description. The class is annotated with @Node Entity . The member of class unique values are represented by @Indexed(unique = true).The RelationType also can be named using the annotation. More info in this regard, Please refer Neo4j Manual and Neo4j Documentation.
@NodeEntity
public class Element extends AbstractEntity {

@Fetch
@RelatedTo(type = "SubElement")
private Set<Element> subElements = new HashSet<Element>();


private Element baseElement;

@Indexed(unique = true)
private String name;

private String value;

private String description;

public void setName(String name) {
this.name = name;
}

public String getName() {
return name;
}

public void setValue(String value) {
this.value = value;
}

public String getValue() {
return value;
}

public void setDescription(String description) {
this.description = description;
}

public String getDescription() {
return description;
}

public Set<Element> getSubElements() {
return subElements;
}

public void setSubElements(Set<Element> subElements) {
this.subElements = subElements;
}

public Element getBaseElement() {
return baseElement;
}

public void setBaseElement(Element baseElement) {
this.baseElement = baseElement;
}

public void addSubElement(Element element) {
if (null == getSubElements() || getSubElements().isEmpty()) {
this.subElements = new LinkedHashSet<Element>();
getSubElements().add(element);
} else {
getSubElements().add(element);
}
}
}
6.Create ElementDAOImpl Class.
Now Create a Class ElementDAOImpl.This class instantiates the context using ApplicationConfig class, thereby the context is used to get the Neo4jTemplate. The repository for the Element class is created using the Neo4jTemplate .This method also provides Implementation of saving,retrieving, deleting, updating, clearing and querying the Graph Database.
@EnableTransactionManagement
public class ElementDAOImpl {
private static ConfigurableApplicationContext context;
private Transaction tx;
private Neo4jTemplate template;
private GraphRepository<Element> repository;

public ElementDAOImpl() {
context = new AnnotationConfigApplicationContext(ApplicationConfig.class);
template = (Neo4jTemplate) context.getBean("template");
repository = template.repositoryFor(org.srinivas.siteworks.neo4j.Element.class);
}

public Element saveElement(Element element) {
tx = template.getGraphDatabase().beginTx();
Element result = repository.save(element);
tx.success();
tx.finish();
tx = null;
return result;
}

public Element retrieveElement(String name) {
tx = template.getGraphDatabase().beginTx();
Element result = repository.findByPropertyValue("name", name);
tx.success();
tx.finish();
tx = null;
return result;
}

public void deleteElement(Element element) {
tx = template.getGraphDatabase().beginTx();
Element ele = repository.findByPropertyValue("name", element.getName());
repository.delete(ele.getId());
tx.success();
tx.finish();
tx = null;
}

public Element updateElement(String name) {
tx = template.getGraphDatabase().beginTx();
Element result = repository.findByPropertyValue("name", name);
tx.success();
tx.finish();
tx = null;
return result;
}

public void clearElements() {
tx = template.getGraphDatabase().beginTx();
repository.deleteAll();
tx.success();
tx.finish();
tx = null;
template.getGraphDatabaseService().shutdown();
}

public Element queryElements(String name) {
tx = template.getGraphDatabase().beginTx();
Map<String, Object> parameterMap = new HashMap<String, Object>();
parameterMap.put("param", name);
String query = "START Element=node:Element(name={param}) RETURN Element";
EndResult<Element> result = repository.query(query, parameterMap);
tx.success();
tx.finish();
tx = null;
return result.singleOrNull();
}

public Neo4jTemplate getTemplate() {
return template;
}

public void setTemplate(Neo4jTemplate template) {
this.template = template;
}
}
7.Create a unit test for ElementDAOImpl Class.
Now that we have all the implementing classes for the Graph Database. Lets add some tests for each of implementing methods for saving, retrieving, deleting clearing and querying the Graph database.
public class ElementDAOImplTest extends TestCase {
private ElementDAOImpl elementDAOImpl;
private Element elementOne;
private Element elementTwo;
private Element elementThree;

public void setUp() {
elementOne = new Element();
elementOne.setName("elementOne");
elementOne.setDescription("descriptionOne");
elementTwo = new Element();
elementTwo.setName("elementTwo");
elementTwo.setDescription("descriptionTwo");
elementTwo.setBaseElement(elementOne);
elementOne.addSubElement(elementTwo);
elementThree = new Element();
elementThree.setName("elementThree");
elementThree.setDescription("descriptionThree");
elementThree.setBaseElement(elementTwo);
elementTwo.addSubElement(elementThree);
elementDAOImpl = new ElementDAOImpl();
}

public void tearDown() {
elementDAOImpl.clearElements();
}

@Test
public void testSaveElement() {
Element result = elementDAOImpl.saveElement(elementOne);
assertEquals("descriptionOne", result.getDescription());
}

@Test
public void testRetrieveElement() {
elementDAOImpl.saveElement(elementOne);
Element result = elementDAOImpl.retrieveElement("elementThree");
assertEquals("descriptionThree", result.getDescription());
}

@Test
public void testDeleteElement() {
elementDAOImpl.saveElement(elementOne);
Element toBeDeletedElement = elementDAOImpl.retrieveElement("elementThree");
elementDAOImpl.deleteElement(toBeDeletedElement);
Element result = elementDAOImpl.retrieveElement("elementThree");
assertNull(result);
}

@Test
public void testUpdateElement() {
elementDAOImpl.saveElement(elementOne);
Element elementFour = new Element();
elementFour.setName("elementFour");
elementFour.setDescription("descriptionFour");
Element changedElement = elementDAOImpl.retrieveElement("elementThree");
changedElement.addSubElement(elementFour);
elementDAOImpl.saveElement(changedElement);
Element result = elementDAOImpl.retrieveElement("elementFour");
assertEquals("descriptionFour", result.getDescription());
}

@Test
public void testQueryElement() {
elementDAOImpl.saveElement(elementOne);
Element element = elementDAOImpl.queryElements("elementTwo");
assertEquals("descriptionTwo", element.getDescription());
}
}
8.Run the Junit Tests and Check the data with neoclipse.
Now run the tests in the ElementDAOImplTest class. The TearDown clears all elements after each Test. Therefore to check the data stored in graph.db, comment out the TearDown method and run one of the test methods. Now we can check, view and manipulate the Data stored in graph.db using Neoclipse.
To work with neoclipse download the neoclipse and run the neoclipse.exe.Click on this link and Download the required Neoclipse.
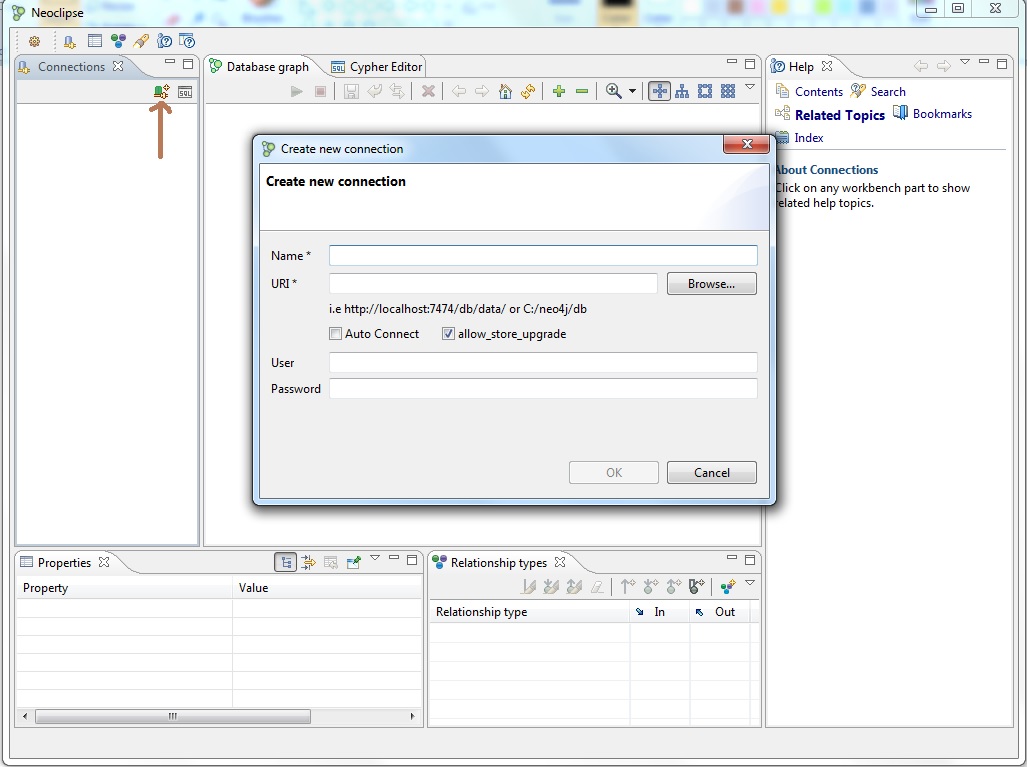
Further as shown below, on the Left hand menu click on new connection and provide full path of the graph.db folder created in the project on the URI field.
Neoclipse New Connection
Neoclipse Cypher Editor
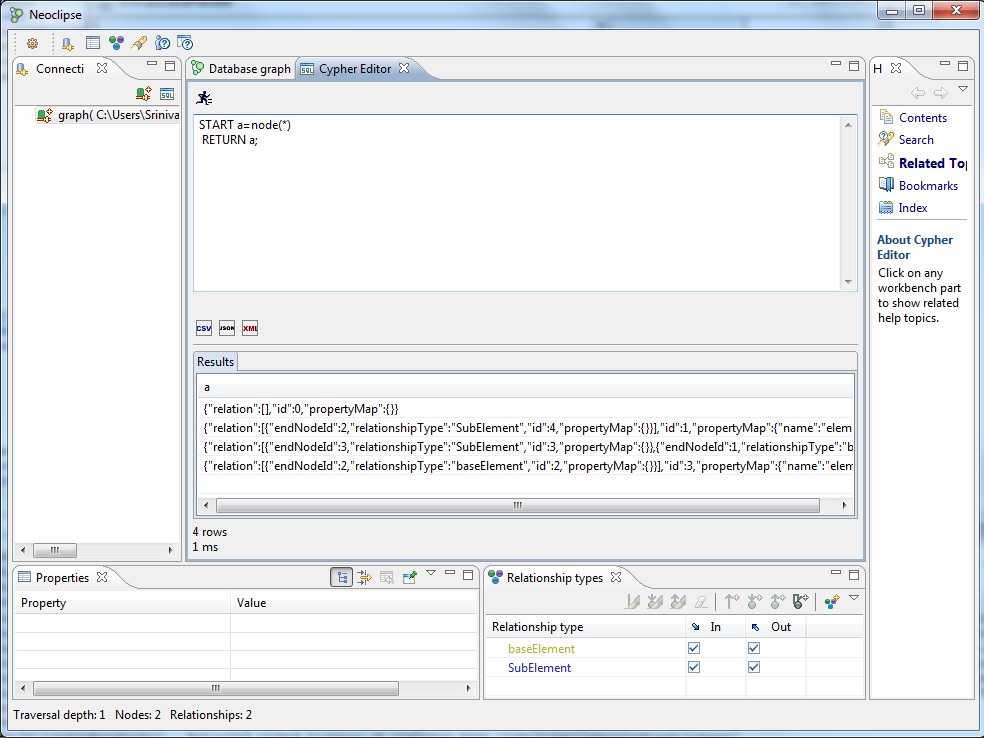
Now start the connection to the database or the database.Further you could query for the nodes, relationship and properties using the cypher editor.
To know more about cypher query language, Please refer documentation on CypherQueryLanguage.
Following are Some of the example cypher queries.
1.START a=node(*) RETURN a;
2.START a=node(1,2,3)  RETURN a;
3.START n=node(*)  MATCH n-[r]-m  RETURN type(r), count(*);
9.Download The Example.
Build the Project after downloading the above Example.
Then execute the ElementDAOImplTest test methods.
The Corresponding Maven commands are available in the ReadMe.txt file of the downloaded project.