SpringMVC Application Without XML
Here we are going to look at creating a simple example of SpringMvC with WebApplicationIntializer. It means that we would not be requiring web.xml as means of initialising the servlet.Therefore we would not have web.xml in our example. We would be programmatically configuring without using the xml files and use annotation based loading of context and beans.
- Project Dependencies.
- Create WebInitializer.
- Create MVC Context Configuration programmatically.
- Create View Configuration programmatically.
- Create helloworld example JSP page.
- Add a unit test for the controller.
- Based on the Unit test create the controller.
- Deploy and Run.
- After Web Application without web.xml.
1.Project Dependencies.
JDK 1.6 or above,In this case have chosen Tomcat 7.0.37 , Spring MVC jars, junit jar and logging jars are the ones we would need. The pom file dependencies are listed below.
	<properties>
		<spring.version>3.2.3.RELEASE</spring.version>
	</properties>
	<dependencies>
		<dependency>
			<groupId>javax.servlet</groupId>
			<artifactId>javax.servlet-api</artifactId>
			<version>3.0.1</version>
			<scope>provided</scope>
		</dependency>
		<dependency>
			<groupId>org.slf4j</groupId>
			<artifactId>jcl-over-slf4j</artifactId>
			<version>1.7.0</version>
		</dependency>
		<dependency>
			<groupId>org.slf4j</groupId>
			<artifactId>slf4j-api</artifactId>
			<version>1.7.0</version>
		</dependency>
		<dependency>
			<groupId>org.slf4j</groupId>
			<artifactId>slf4j-log4j12</artifactId>
			<version>1.7.0</version>
		</dependency>
		<dependency>
			<groupId>org.springframework</groupId>
			<artifactId>spring-webmvc</artifactId>
			<version>${spring.version}</version>
		</dependency>
		<dependency>
			<groupId>org.springframework</groupId>
			<artifactId>spring-expression</artifactId>
			<version>${spring.version}</version>
		</dependency>
		<dependency>
			<groupId>org.springframework</groupId>
			<artifactId>spring-test</artifactId>
			<version>${spring.version}</version>
		</dependency>
		<dependency>
			<groupId>junit</groupId>
			<artifactId>junit</artifactId>
			<version>4.11</version>
		</dependency>
		<dependency>
			<groupId>commons-logging</groupId>
			<artifactId>commons-logging</artifactId>
			<version>1.1.1</version>
		</dependency>
	</dependencies>
Packing using the maven plugins...
	<build>
		<plugins>
			<plugin>
				<groupId>org.apache.maven.plugins</groupId>
				<artifactId>maven-compiler-plugin</artifactId>
				<version>3.1</version>
				<configuration>
					<source>1.6</source>
					<target>1.6</target>
				</configuration>
			</plugin>
			<plugin>
				<artifactId>maven-war-plugin</artifactId>
				<version>2.1.1</version>
				<configuration>
					<failOnMissingWebXml>false</failOnMissingWebXml>
					<webResources>
						<resource>
							<directory>src\main\webapp</directory>
						</resource>
					</webResources>
				</configuration>
			</plugin>
		</plugins>
		<finalName>SpringMVCWebInitializer</finalName>
	</build>
If you want to run quickly without deploying to Standalone Tomcat Instance then add Tomcat7 plugin to the above Plugins. For more info on Tomcat Plugin, Please refer to Tomcat Plugin Documentation.
	<plugin>
            <groupId>org.apache.tomcat.maven</groupId>
            <artifactId>tomcat7-maven-plugin</artifactId>
            <version>2.2</version>
            <configuration>
               <warFile>${project.build.outputDirectory}/${project.build.finalName}.war</warFile>
               <mode>both</mode>
            </configuration>
      </plugin>
2.Create WebInitializer.
SpringMVC with Servlet 3.0 detects the WebApplicationInitializer implementations by using SpringServletContainerInitializer. Thus help to initialize our web application by configuring the ServletContext programmatically.So We create a class SrinivasExampleWebApplicationInitializer which implements the WebApplicationInitializer. This class methods starts up the web application with a Servlet registered with required contexts and beans. In This class a DispatcherServlet is created containing programmatically configured AnnotationConfigWebApplicationContext.The dispatcher is also mapped to .html. For more info on WebApplicationInitializer, Please refer here..
public class SrinivasExampleWebApplicationInitializer implements WebApplicationInitializer {

	private static final Logger logger = LoggerFactory.getLogger(SrinivasExampleWebApplicationInitializer.class);
	/* (non-Javadoc)
	 * @see org.springframework.web.WebApplicationInitializer#onStartup(javax.servlet.ServletContext)
	 */
	@Override
	public void onStartup(ServletContext container) {
		logger.info("Started to pickup the annotated classes");
		startServlet(container);
	}
	private void startServlet(final ServletContext container) {
		WebApplicationContext dispatcherContext = registerContext(MvcContextConfiguration.class);
		DispatcherServlet dispatcherServlet = new DispatcherServlet(dispatcherContext);
		ServletRegistration.Dynamic dispatcher;
		dispatcher = container.addServlet("dispatcher",dispatcherServlet);
		dispatcher.setLoadOnStartup(1);
		dispatcher.addMapping("*.html");
	}
	private WebApplicationContext registerContext(final Class<?>... annotatedClasses) {
		logger.info("Using AnnotationConfigWebApplicationContext createContext");
		AnnotationConfigWebApplicationContext context = new AnnotationConfigWebApplicationContext();
		context.register(annotatedClasses);
		return context;
	}
}
3.Create MVC Context Configuration programmatically.
Now, We are going to configure the MVC context programmatically. This is achieved by creating a class MvcContextConfiguration which extends the Abstract WebMvcConfigurerAdapter.Usually MvcContextConfiguration class can contain method for registering interceptors for security purposes, can contain method to register view controllers and so on.We in this case override the method configureDefaultServletHandling(final DefaultServletHandlerConfigurer configurer) by enabling DefaultServletHandlerConfigurer.This means unhandled requests are delegated by forwarding to the Servlet container's "default" servlet. This method is optional and is not required in our example.However it is included to explain the purpose achieved by overriding the methods of WebMvcConfigurerAdapter. MvcContextConfiguration class enables WebMVC based on annotation and scans the base packages for the annotated resources. These are further registered by the web application context of the default servlet which was initialized by WebApplicationInitializer. For more info on WebMvcConfigurerAdapter, Please refer here..
@Configuration
@EnableWebMvc
@ComponentScan(basePackages = { "org.srinivas.siteworks","org.srinivas.siteworks.controller" })
public class MvcContextConfiguration extends WebMvcConfigurerAdapter {
	private static final Logger logger = LoggerFactory.getLogger(MvcContextConfiguration.class);
	/* (non-Javadoc)
	 * @see org.springframework.web.servlet.config.annotation.WebMvcConfigurerAdapter#configureDefaultServletHandling(org.springframework.web.servlet.config.annotation.DefaultServletHandlerConfigurer)
	 */
	@Override
	public void configureDefaultServletHandling(final DefaultServletHandlerConfigurer configurer) {
		logger.info("WebMvcContextConfiguration: configureDefaultServletHandling Method");
		configurer.enable();
	}
}
4.Create View Configuration programmatically.
We now create a class ViewConfiguration.This class beans are loaded during the component scan of class MvcContextConfiguration. Thereby it is registered to the servlet. We programmatically configure a ViewResolver bean of Type InternalResourceViewResolver in this class. This helps the view class to be preconfigured with the set prefix and set suffix.
@Configuration
public class ViewConfiguration {
	private static final Logger logger = LoggerFactory.getLogger(ViewConfiguration.class);
	@Bean
	public ViewResolver viewResolver() {
		logger.info("ViewConfiguration viewResolver()");
		InternalResourceViewResolver viewResolver = new InternalResourceViewResolver();
		viewResolver.setOrder(1);
		viewResolver.setPrefix("/WEB-INF/displays/");
		viewResolver.setSuffix(".jsp");
		return viewResolver;
	}
}
5.Create helloworld example JSP page.
Now, we need to create a simple jsp page which takes the model attribute message which was set in the Controller.
<%@ page language="java" contentType="text/html; charset=ISO-8859-1" pageEncoding="UTF-8"%>
<!DOCTYPE html PUBLIC "-//W3C//DTD HTML 4.01 Transitional//EN" "http://www.w3.org/TR/html4/loose.dtd">
<html>
<head>
<meta http-equiv="Content-Type" content="text/html; charset=ISO-8859-1">
<title>My Works:WebApplicationInitializer</title>
</head>
<body>
 <p>${message}</p>
</body>
</html>
6.Add a unit test for your controller.
Now, we need to add unit test for the controller of helloworld.jsp that we created. In this case we are executing the unit test using SpringJUnit4ClassRunner. We are actually checking the HelloWorldController for successful status, return of view string and for the message attribute. For more info on MockMvC, Please refer here..
@RunWith(SpringJUnit4ClassRunner.class)
@ContextConfiguration
public class HelloWorldControllerTest {
	private static final Logger logger = LoggerFactory.getLogger(HelloWorldControllerTest.class);
	@Autowired
	private HelloWorldController helloWorldController;
	@Test
	public void testHelloPage() {
		MockMvc mockMvc = MockMvcBuilders.standaloneSetup(this.helloWorldController).build();
		try {
			mockMvc.perform(MockMvcRequestBuilders.get("/helloworld.html"))
					.andExpect(status().isOk())
					.andExpect(view().name("helloworld"))
					.andExpect(forwardedUrl("helloworld"))
					.andExpect(handler().methodName("helloPage"))
					.andExpect(model().attribute("message",HelloWorldController.STRING_MESSAGE_WELCOME_TO_WEB_APPLICATION_INITIALISER));
		} catch (Exception e) {
			logger.info(e.getMessage());
			fail("Failed Due to: "+e.getMessage());
		}
	}
	@Configuration
	static class HelloWorldControllerTestConfiguration {

		@Bean
		public HelloWorldController helloWorldController() {
			return new HelloWorldController();
		}
	}
}
7.Based on the Unit test create the controller.
Based on the expected results in the Unit test for helloworld.jsp controller that we created above.We now create the HelloWorldController.
@Controller
@RequestMapping(value = "/helloworld.html")
public class HelloWorldController {
	public static final String STRING_MESSAGE_WELCOME_TO_WEB_APPLICATION_INITIALISER = "Welcome to WebApplication Initialiser";
	private static final Logger logger = LoggerFactory.getLogger(HelloWorldController.class);
	@RequestMapping(method = RequestMethod.GET)
	public String helloPage(Model model) {
		logger.info("HelloWorldController");
		model.addAttribute("message",STRING_MESSAGE_WELCOME_TO_WEB_APPLICATION_INITIALISER);
		return "helloworld";
	}
}
8.Deploy and Run.
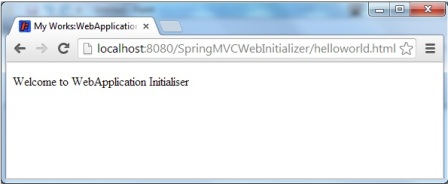
Build the project and deploy SpringMVCWebInitializer.war from target folder on to the chosen Tomcat 7.0.37. For Maven building of the project you can refer to ReadMe.txt instructions in the worked out example. You can download the Worked example. You can also download the Worked example with Tomcat Plugin and Follow the commands provided in the zip to run embedded Tomcat. Following deployment to Tomcat(emmbedded or standalone) and starting the Tomcat(Standalone),the localhost result is as below.
9. After Web Application without web.xml
Now that we have programmatically configured the web application without using web.xml. We can still use web.xml without completely avoiding it for the purposes like session config, error pages and etc...
	<session-config>
	<session-timeout>30</session-timeout>
	</session-config>